
Main Courses
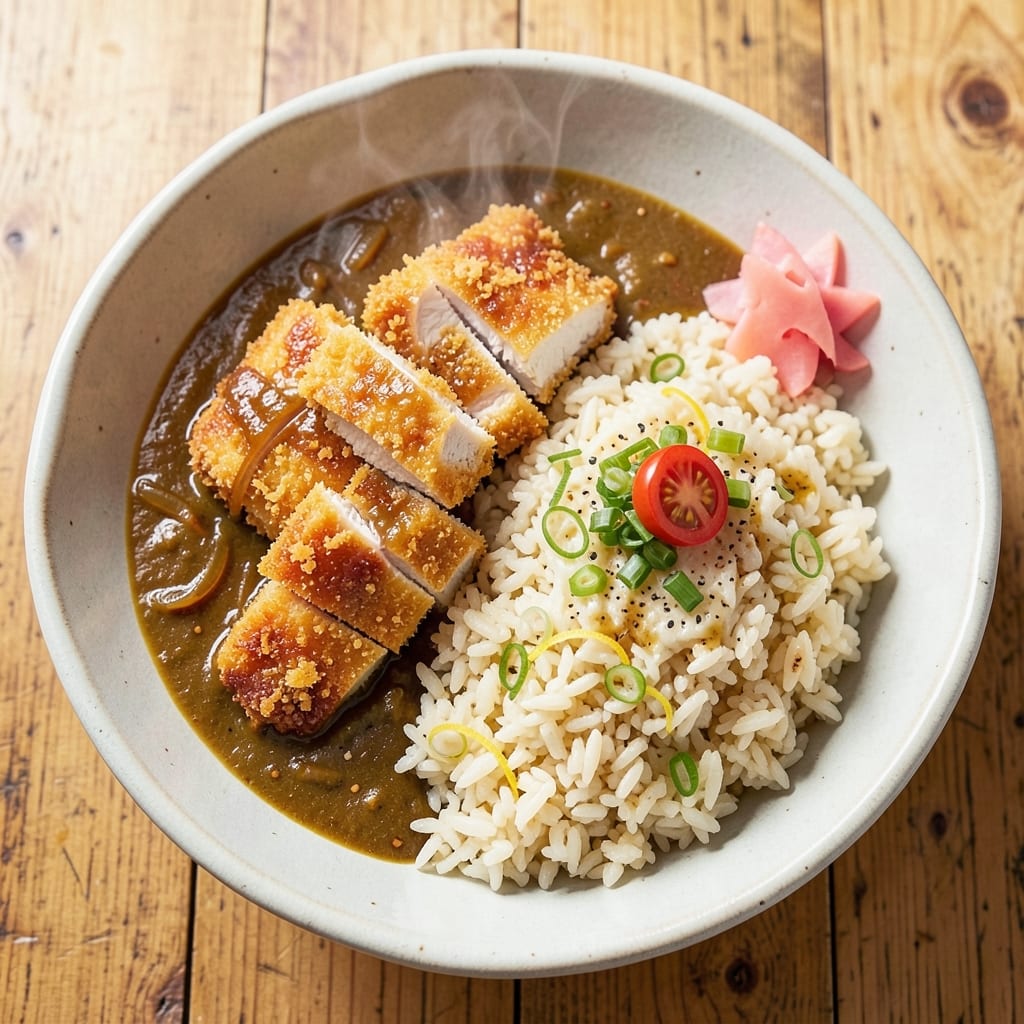
The authentic Japanese chicken katsu curry delivers restaurant-quality flavor in your home kitchen. This dish combines a perfectly crispy panko-crusted chicken cutlet with a rich, aromatic curry sauce that's deeply savory and slightly sweet. After years of perfecting the technique—from the golden-brown crust to the velvety sauce—I've cracked the code for achieving that exact balance of textures and flavors.
What sets this recipe apart is the attention to detail that makes it truly authentic: the proper roux-thickened curry sauce, the precise frying technique for that signature crunch, and the harmony of traditional sides. The secret lies in using a blend of flour and cornstarch for the breading, which creates that satisfying crunch while keeping the chicken tender inside. And the curry sauce? It's built layer by layer, starting with a rich roux that forms the foundation for the complex spice blend.
By the time you're done, you'll have a dish that's crispy on the outside, tender on the inside, and swimming in a sauce that's perfectly balanced between sweet, savory, and umami. The aroma alone will have everyone gathered around the table, and each bite delivers that perfect combination of textures and flavors that makes this dish so beloved. This is comfort food at its finest—warm, satisfying, and deeply comforting.
Serve it with steamed Japanese rice, quick-pickled vegetables, and a bowl of miso soup for the complete experience. The crispy katsu cutlet stays satisfyingly crunchy even after being coated in the rich curry sauce, making every bite worth the effort. Let's get cooking—this is the kind of meal that turns an ordinary weeknight into something special.
Ingredients for authentic japanese chicken katsu curry
Crispy panko crust meets velvety curry sauce—just these ingredients transform ordinary chicken into restaurant-quality katsu.
| Ingredient | Amount | Notes |
|---|---|---|
| Boneless, Skinless Chicken Breast 🍗 | 1 ½ lb | Pounded to even thickness |
| All-Purpose Flour 🌾 | ½ cup | For breading mixture |
| Cornstarch 🌾 | ¼ cup | For extra crunch |
| Japanese Panko Breadcrumbs 🍞 | 2 cups | Fresh, not pre-moistened |
| Large Eggs 🥚 | 2 whole | Beaten for egg wash |
| Vegetable Oil 🫒 | 3 cups | For deep frying |
| Unsalted Butter 🧈 | 2 tbsp | For roux base |
| All-Purpose Flour 🌾 | ¼ cup | For roux thickening |
| Japanese Curry Block 🧂 | 1 piece | S&B Golden Curry preferred |
| Chicken Stock 💧 | 1 ½ cups | Homemade or quality brand |
| Dried Onion 🧅 | 1 tsp | For depth of flavor |
| Worcestershire Sauce 🍶 | 1 tbsp | For umami richness |
| Honey 🍯 | 1 tbsp | For subtle sweetness |
| Salt 🧂 | 1 tsp | Kosher or sea salt |
| Black Pepper 🌶️ | ½ tsp | Freshly ground preferred |
The chicken breast is non-negotiable—look for pieces with even thickness so they cook uniformly. Costco or local butchers often have pre-cut boneless, skinless breasts, but if you're buying whole, ask for the flattest cuts. Pound them to exactly 1/4-inch thickness with a meat mallet or rolling pin. The panko should be fresh and dry—none of that pre-moistened stuff from the can. Japanese specialty stores carry the best, but most Asian markets stock it too. Pro tip: Toast your panko in a dry pan for 2 minutes before using—it gets even crunchier.
No Japanese curry block? S&B Golden Curry is the gold standard, but Mae Ploy or Thai Kitchen work in a pinch. The roux is where the magic happens—use unsalted butter and cook it until it's a deep golden brown, almost nutty. That's your flavor foundation. Worcestershire sauce adds depth, but if you're avoiding it, soy sauce or a splash of fish sauce works too. The honey balances the richness—don't skip it, but if you're avoiding sugar, maple syrup at half the amount is a decent swap. And trust me on the cornstarch—it's what gives that signature crispy texture.
Fry the chicken in batches—don't crowd the pan or it'll steam instead of crisp. Keep the oil at 350°F for that perfect golden crust. The curry sauce can be made ahead and reheated gently—it actually tastes better the next day as the flavors meld. Store leftovers in the fridge for 3-4 days or freeze for 2 months. I always make extra sauce because it disappears fast. Serve with steamed rice and quick-pickled veggies—it's the whole experience.
Why You'll Love This Recipe
- No-Fuss Breading: I swear by the flour-cornstarch mix—it keeps the katsu crispy without being greasy, and the panko adds that perfect crunch. No fancy techniques, just pound the chicken thin, dip, and fry. (Yes, even my husband—who burns toast—can handle it.)
- Umami Bomb: That curry roux? Thick, rich, and packed with the kind of deep flavor that makes you pause mid-bite. The chicken stays juicy while the sauce clings like a warm hug—no dry bites here, just pure satisfaction.
- Lunchbox Hero: Double the batch and you’ve got dinner tonight and tomorrow’s lunch sorted. The curry reheats beautifully, and the katsu stays crispy if you wrap it tightly—my kids’ school lunches have never been more popular.
- Budget Crunch: Chicken breast is cheap, and this recipe stretches easily. A single pan, minimal ingredients, and leftovers that taste just as good the second time. Honestly, it’s the kind of meal that makes grocery day less stressful.
Step-by-step instructions for authentic Japanese chicken katsu curry
Here's how to nail that perfect crispy katsu crust and velvety curry sauce every time.
Prepare the Chicken Cutlets
Start by pounding the 1.5 lb boneless, skinless chicken breast between two sheets of plastic wrap until it's an even ½-inch thickness. This ensures even cooking and prevents dryness. I like to press down firmly with a meat mallet, rotating the chicken as needed to maintain consistent thickness throughout.
Season both sides generously with 1 tsp salt and ½ tsp black pepper. The salt helps draw out moisture for better browning, while the pepper adds subtle depth. Let the seasoned chicken rest at room temperature for 15 minutes before breading—this prevents the meat from shrinking during cooking.
Create the Breading Station
Set up three shallow bowls: one with ½ cup all-purpose flour mixed with ¼ cup cornstarch (this combo gives extra crunch), one with the 2 whole large eggs beaten until frothy, and one with the 2 cups Japanese panko breadcrumbs. The cornstarch in the flour mixture is key—it creates that signature crispy texture that regular flour alone can't achieve.
Work with one piece of chicken at a time to avoid soggy breading. Dip the seasoned chicken into the flour mixture, shaking off any excess, then into the beaten eggs, letting any excess drip off, and finally into the panko breadcrumbs, pressing gently to adhere. Repeat until all pieces are breaded. Let them rest for 5 minutes before frying—this helps the coating set and prevents crumbs from falling off.
Fry to Golden Perfection
Heat 3 cups vegetable oil in a deep skillet or Dutch oven to 350°F. Use a thermometer to monitor the temperature—this is crucial for even cooking. Once hot, carefully add the breaded chicken cutlets in a single layer, being careful not to overcrowd the pan. Fry for 3-4 minutes per side until they're deep golden brown and the internal temperature reaches 165°F. The panko should be crispy and the chicken juicy inside.
Transfer the fried chicken to a paper towel-lined plate to drain excess oil. Keep them warm in a 200°F oven while you prepare the curry sauce. If the oil smokes excessively, reduce the heat slightly—smoke means the oil is too hot and will burn your breading.
Build the Curry Sauce
In a separate pot, melt 2 tbsp unsalted butter over medium heat, then whisk in ¼ cup all-purpose flour to form a roux. Cook for 1-2 minutes until the mixture turns a light golden color—this removes the raw flour taste and adds richness. Gradually whisk in 1.5 cups chicken stock, scraping up any browned bits from the bottom of the pot for maximum flavor.
Add the 1 piece Japanese curry block, 1 tsp dried onion, 1 tbsp Worcestershire sauce, 1 tbsp honey, and bring the mixture to a gentle simmer. Let it cook for 10-15 minutes, stirring occasionally, until the sauce thickens to a smooth, velvety consistency. The curry block will dissolve completely, releasing its signature sweet and savory flavors. Taste and adjust seasoning with additional salt or pepper if needed.
Combine and Serve
Return the fried chicken cutlets to the pot with the curry sauce. Gently simmer for 2-3 minutes, spooning the sauce over the chicken to coat evenly. The residual heat will warm the chicken through and infuse it with the rich curry flavors. Serve immediately over steamed white rice, ensuring each bite delivers that perfect balance of crispy katsu and creamy curry sauce.
For an authentic touch, garnish with a sprinkle of Japanese panko breadcrumbs on top of the curry sauce. The contrast of textures and flavors—crispy, creamy, and savory—is what makes this dish so irresistibly delicious. Enjoy your homemade Japanese chicken katsu curry!
Pro Tips For Making Authentic Japanese Chicken Katsu Curry
- Pound Chicken Thin: Chicken breast fights back when thinly pounded—aim for ½-inch thickness or less, or it’ll dry out in the pan. Use a rolling pin or meat mallet, but don’t go full-on sushi-thin; you want a sturdy cut that stays juicy through frying.
- Mix Cold Flour First: Dip the chicken in flour + cornstarch (1:1 ratio) before the egg wash—this creates a tighter, crispier crust. Cold flour sticks better than room-temp, and the cornstarch prevents soggy breading. (Yes, even if you’re impatient like me.)
- Fry in Batches: Crowding the pan drops the temperature fast, leading to greasy, uneven katsu. Fry 2-3 pieces at a time in ¼-inch oil at 350°F (175°C), and resist the urge to flip too soon—wait for a golden-brown crust (3-4 minutes per side).
- Toast Panko Dry: Skip the wet breadcrumbs—they’ll make your katsu soggy. Lightly toast the panko in a dry pan for 1-2 minutes until fragrant. The extra crunch and flavor are worth the 60 seconds. (Your future self will notice.)
Creative variations of this authentic japanese chicken katsu curry
Spicy Miso Katsu
For a bold twist, swap the curry block for 2 tbsp white miso paste mixed with 1 tbsp gochujang (Korean chili paste) in the sauce. Use 1 cup chicken stock instead of the full amount, and add ½ cup water to balance the thickness. Simmer for 10 minutes until the sauce is glossy and slightly sticky. The miso adds deep umami, while the gochujang brings heat. Garnish with thinly sliced green onions and a drizzle of sriracha for extra kick. 🌶️
Vegetarian Katsu Curry
Replace the chicken with 1.5 lb extra-firm tofu, pressed and sliced into cutlets. Use the same breading process, but press the tofu between paper towels for 30 minutes first to remove excess moisture. For the sauce, add 1 tbsp soy sauce and ½ tsp grated ginger to the roux for extra depth. The texture stays crispy, and the sauce clings beautifully to the tofu. Serve with pickled daikon radish for a refreshing contrast.
Sweet Potato Katsu
Swap the chicken for 2 large sweet potatoes, peeled and sliced into ½-inch thick rounds. Parboil for 5 minutes to soften slightly, then pat dry before breading. Use the same flour-cornstarch mixture, but add 1 tsp smoked paprika to the flour for warmth. The sweet potatoes absorb the curry sauce beautifully, creating a hearty, naturally sweet dish. Top with crispy fried onions for texture.
Seafood Katsu Curry
For a seafood twist, use 1.5 lb firm white fish like cod or halibut, cut into ½-inch thick cutlets. Skip the pounding—just press gently to even thickness. Use the same breading method, but fry at 340°F for 2-3 minutes per side to avoid overcooking. The curry sauce stays the same, but add ½ tsp lemon zest to brighten the flavors. Serve with steamed bok choy on the side for a lighter meal.
Thai-Inspired Curry
Infuse the curry sauce with Thai flavors by adding 1 tbsp red curry paste (like Maesri) along with the curry block. Use 1 cup coconut milk instead of chicken stock, and add 1 stalk lemongrass, bruised, to the simmering sauce. Strain before serving. The result is a fragrant, slightly spicy curry that pairs perfectly with the crispy katsu. Garnish with cilantro and lime wedges for freshness.
Kids' Friendly Mild Version
For picky eaters, reduce the curry block to ½ piece and add 1 tbsp tomato paste to the roux for a milder, slightly tangy flavor. Use 1 tbsp maple syrup instead of honey, and skip the Worcestershire sauce. Cut the katsu into fun shapes with cookie cutters before frying—kids love the playful presentation! Serve with steamed edamame and a side of cucumber slices for dipping.
Nutrition facts
Frequently asked questions
Can I use regular breadcrumbs instead of Japanese panko?
While you can substitute regular breadcrumbs, you'll lose that signature crispy texture. Japanese panko's light, airy structure creates a much better crunch. If you must use regular breadcrumbs, pulse them in a food processor for a finer texture and toast them in a dry pan for 2-3 minutes before using. The cornstarch in the flour mixture helps compensate slightly.
How do I prevent the chicken from getting soggy?
Work quickly and keep everything separate until frying. Use a wire rack over a baking sheet to drain excess oil after frying, then keep the chicken warm in a 200°F oven while making the sauce. Never let the breaded chicken sit in the egg wash or flour mixture longer than necessary—excess moisture is the enemy of crispiness.
What's the best way to reheat leftovers?
Reheat in a 350°F oven for 10-12 minutes on a wire rack to maintain crispiness. For the sauce, warm it gently on the stove over low heat while stirring constantly. Microwaving will make the breading soggy—avoid it at all costs. Leftovers keep well for 3-4 days in the fridge or 2 months in the freezer.
Can I make the curry sauce ahead of time?
The sauce actually tastes better the next day as flavors meld. Store it in an airtight container in the fridge and reheat gently on the stove. You can even freeze it for up to 3 months. Just thaw overnight in the fridge before using. The roux will hold its texture beautifully when reheated properly.
What are the best sides to serve with this dish?
For authenticity, serve with steamed Japanese short-grain rice, quick-pickled vegetables (like cucumbers or daikon), and a bowl of miso soup. The acidity of pickled veggies cuts through the richness of the curry beautifully. For a heartier meal, add steamed bok choy or a simple green salad with sesame dressing.