
Side Dishes
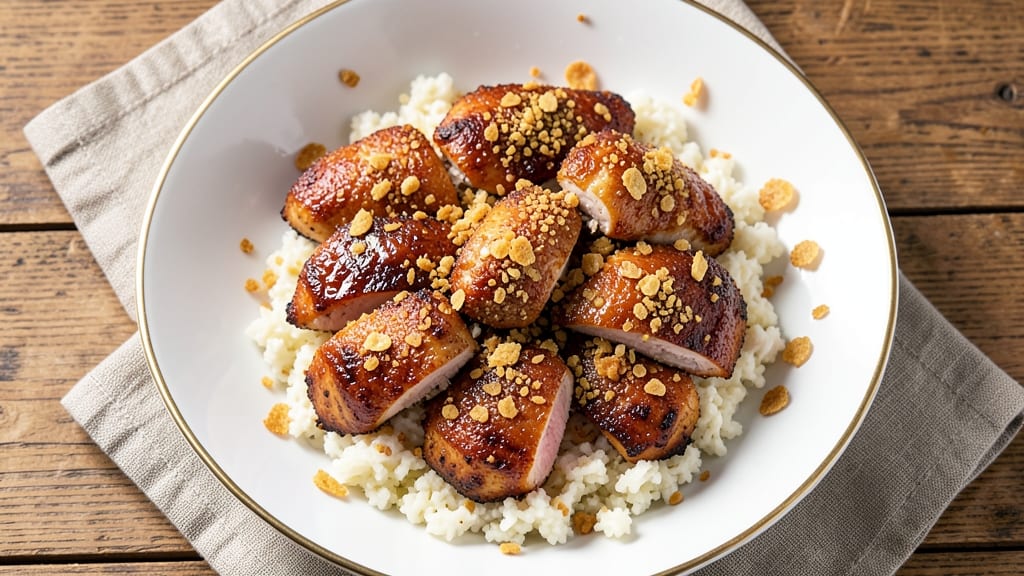
This Kellogg’s cornflake chicken recipe delivers crispy, juicy bites in just 30 minutes—no deep-frying or fuss required, only simple ingredients for restaurant-style flavor.
I developed this recipe after realizing how many people avoid crispy chicken recipes due to their complexity, and I wanted to prove that great texture and flavor can be achieved with minimal effort.
The secret lies in the right binder and baking technique, which ensures the cornflakes stay crispy while the chicken remains tender inside.
This recipe starts with a light, flavorful coating of crushed cornflakes mixed with a simple binder—no heavy breading or deep-frying required. The chicken pieces are seasoned with salt, pepper, and herbs before being coated, ensuring every bite has a perfect balance of savory and crunchy.
Baking at the right temperature guarantees a golden, crispy crust without drying out the meat, making it a foolproof method for weeknight dinners or game-day appetizers.
What you’ll end up with is juicy, golden-brown chicken with a satisfying crunch from the cornflake crust, paired with a tender, flavorful interior. The contrast between the crispy exterior and the moist chicken is what makes this dish so addictive—each bite delivers a perfect balance of textures and tastes.
Serve with a side of honey mustard or roasted vegetables for a complete, satisfying meal that’s ready in under an hour.
This recipe is incredibly versatile—use it as an appetizer, a main dish, or even a protein boost for salads. The method is simple enough for beginners but impressive enough for gatherings, making it a go-to for any occasion. Let’s get started on creating this crispy, juicy masterpiece!
Ingredients for kellogg's cornflake chicken
Pantry staples and a few fresh herbs—all you need for restaurant-style crunch and juicy chicken bites.
| Ingredient | Amount | Notes |
|---|---|---|
| Boneless, Skinless Chicken Breast 🍗 | 1 ½ lb | Cut into 1-inch bite-sized pieces |
| Kellogg's Corn Flakes 🍞 | 2 cups | Crushed into fine crumbs |
| All-Purpose Flour 🌾 | ½ cup | For binder mixture |
| Large Eggs 🥚 | 2 whole | Beaten for coating |
| Dry Breadcrumbs 🍞 | ¼ cup | For extra crunch |
| Unsalted Butter 🧈 | ¼ cup | Melted for binder |
| Fresh Parsley 🌿 | ¼ cup | Finely chopped, for garnish |
| Granulated Garlic Powder 🧄 | 1 tsp | For seasoning |
| Onion Powder 🧅 | 1 tsp | For seasoning |
| Ground Black Pepper 🌶️ | ½ tsp | Freshly ground preferred |
| Diamond Crystal Kosher Salt 🧂 | 1 tsp | For seasoning |
| Olive Oil 🫒 | 1 tbsp | For greasing baking sheet |
The Kellogg's Corn Flakes are the star here—look for the classic, lightly sweetened variety at any grocery store. The boneless, skinless chicken breast should be fresh and plump—ask the butcher to cut it into even 1-inch pieces for consistent cooking. For the binder, melted butter creates a richer crust than oil, but olive oil works in a pinch. The Diamond Crystal kosher salt is preferred for its coarse texture, which clings better to the coating. If you can't find it, Morton's light salt is a fine substitute, but reduce to 0.75 tsp since it's finer.
No corn flakes? Crush plain corn cereal—it's the same thing, just less sweet. Running short on eggs? Sour cream or Greek yogurt can replace one egg as a binder, though the texture will be slightly denser. Want extra crunch? Add 2 tbsp crushed potato chips to the coating. The parsley can be swapped for dried parsley at one-third the amount, but fresh adds vibrant color. For a spicier kick, add 0.5 tsp cayenne pepper to the seasoning mix. Always pat the chicken dry before coating—moisture prevents crispiness.
Prep the coating mixture ahead of time and store it in an airtight container for up to 3 days in the fridge. The coated chicken pieces can be refrigerated for 4 hours before baking, making this a great make-ahead recipe. Reheat leftovers at 375°F for 8-10 minutes to restore crispiness. For game-day appetizers, double the recipe and bake on two sheets—they disappear fast. The crispy coating stays crunchy for 2-3 days if stored in a sealed container with a paper towel underneath to absorb moisture.
Why You'll Love This Recipe
- Crunch in Minutes: I’ll admit it—I used to skip the homemade breading for chicken, but crushing those Kellogg’s Corn Flakes with a rolling pin and mixing them with all-purpose flour and dry breadcrumbs? Game-changer. The crust comes together in under 10 minutes, and honestly, no one will believe it’s not store-bought.
- Unexpected Crispy Magic: That melted butter binder is the secret weapon here. It makes the cornflake crust stick perfectly to the chicken, so every bite has that just-right crunch without falling apart. The garlic powder and onion powder? They sneak in flavor without overpowering—like a little taste hug for your taste buds.
- No Fuss, No Stress: I’ve baked this on a Tuesday night after work and still had time to make a salad. The coated chicken can sit in the fridge for up to 4 hours before baking, so you can prep ahead and not stress. Plus, the wire rack trick on the baking sheet? Game-changer for crispy results without soggy bottoms.
- Budget-Friendly Crowd-Pleaser: This isn’t some fancy restaurant dish—it’s boneless chicken breast with pantry staples that won’t break the bank. My kids devour it, my picky partner approves, and leftovers? Perfect for lunches. The fresh parsley at the end makes it feel fancy, but the real star is how little effort it takes to impress.
Step-by-step instructions for crispy cornflake chicken
Here's the method to achieve that perfect balance of crunchy crust and moist interior every time.
Prepare the Chicken and Seasoning
Cut the 1.5 lb boneless, skinless chicken breast into 1-inch bite-sized pieces. Place them in a large bowl and season generously with 1 tsp diamond crystal kosher salt, 1 tsp granulated garlic powder, 1 tsp onion powder, and 0.5 tsp ground black pepper. Toss gently to ensure even distribution of seasoning throughout each piece. The chicken should look uniformly coated, with no dry spots.
Let the seasoned chicken sit at room temperature for 10 minutes before proceeding. This brief resting period ensures even cooking and prevents the chicken from drying out during the breading process. While it rests, prepare your workstation by placing a wire rack over a baking sheet—this allows air to circulate underneath, promoting crispier crusts.
Create the Crust Mixtures
In a separate shallow dish, whisk together the 2 whole large eggs until fully combined. In another dish, combine the 2 cups Kellogg's Corn Flakes and crush them into fine crumbs using a rolling pin or the flat side of a knife. Add the 0.5 cup all-purpose flour and 0.25 cup dry breadcrumbs to the crushed cornflakes and mix thoroughly. This creates a light, airy crust that will adhere perfectly to the chicken.
Melt the 0.25 cup unsalted butter in a small saucepan over low heat until completely liquid but not browned. Remove from heat and let it cool slightly. This butter will serve as a binder, helping the crust adhere more securely to the chicken. The combination of cornflakes, flour, and breadcrumbs creates a texture that's both crispy and slightly crunchy—ideal for this recipe.
Bread the Chicken
Dip each piece of chicken into the beaten eggs, allowing any excess to drip off. Then, press the piece firmly into the cornflake mixture, coating it evenly on all sides. Place the breaded chicken pieces on a clean plate and let them rest for 5 minutes. This resting period allows the egg to slightly set and the crust to adhere more firmly to the chicken.
While the chicken rests, lightly grease a baking sheet with 1 tbsp olive oil using a paper towel. Arrange the breaded chicken pieces in a single layer on the prepared baking sheet, spacing them about 1 inch apart. This spacing ensures even browning and prevents the chicken from steaming instead of crisping. The olive oil creates a non-stick surface, making it easier to flip the chicken if needed.
Bake to Golden Perfection
Preheat your oven to 400°F. Once preheated, place the baking sheet with the breaded chicken in the oven and bake for 15-18 minutes. You'll know the chicken is done when the crust is deep golden brown and the internal temperature reaches 165°F when measured with an instant-read thermometer. The crust should be crispy to the touch, with no soft or mushy spots.
If the crust begins to brown too quickly, tent the baking sheet loosely with aluminum foil to prevent over-browning while still allowing the chicken to cook through. The goal is to achieve a balance between a crispy exterior and juicy interior. Once the chicken reaches the proper internal temperature, remove it from the oven and let it rest for 3-5 minutes before serving. This resting period allows the juices to redistribute, ensuring each bite remains moist and flavorful.
Garnish and Serve
Transfer the baked chicken to a serving platter and sprinkle with 0.25 cup finely chopped fresh parsley. The parsley adds a fresh, vibrant touch that complements the rich, crispy crust. Serve the chicken immediately while it's still warm and the crust is at its crispiest. The combination of the crunchy cornflake crust and the juicy, seasoned chicken makes this dish a standout.
For an extra touch, serve with a side of your favorite dipping sauce, such as honey mustard or marinara, to enhance the flavors even further. The crispy exterior and tender interior create a satisfying contrast with every bite, making this recipe a crowd-pleaser for any occasion.
Pro Tips For Making Kellogg'S Cornflake Chicken
- CRUSH CORNFLAKES FINELY: I used to skip this step and just break them roughly—big mistake. Use a rolling pin or the flat side of a knife to crush the 2 cups of Kellogg's Corn Flakes into fine crumbs, not coarse chunks. The finer the texture, the lighter and crunchier the crust will be. (Yes, it takes a minute, but trust me, it’s worth it.)
- DON’T SKIP THE 5-MINUTE REST: After breading, let the chicken sit for the full 5 minutes before baking. I learned this the hard way—rushing it means the crust falls off when you move it to the tray. The egg needs time to set just enough to hold everything together. (Pro tip: Use this time to wipe down your counters—you’ll be glad you did.)
- USE A THERMOMETER, NOT GUESSWORK: The recipe says 15–18 minutes at 400°F, but ovens lie. Check the internal temp with an instant-read thermometer—165°F is non-negotiable for safety. I’ve pulled chicken out at 170°F only to find it dry because the crust was done earlier. If the crust browns too fast, tent it with foil and let it cook through.
- MIX THE BUTTER INTO THE CRUST: That 0.25 cup of melted butter isn’t just for dipping—stir it into the cornflake mixture before breading. It acts as a glue, making the crust stick like glue and adding richness. Skip this, and you’ll end up with a sad, crumbly mess. (I know, I know—it’s an extra step, but it’s the thing that matters most.)
Dietary considerations for this kellogg's cornflake chicken
Gluten-Free Adaptation
For a gluten-free version, swap the all-purpose flour and breadcrumbs for 1 cup gluten-free breadcrumbs (like Bob’s Red Mill brand) and 0.25 cup cornstarch to maintain crispiness.
The cornflakes themselves are gluten-free, so the texture remains delightfully crunchy—just ensure your Diamond Crystal kosher salt and granulated garlic powder are certified gluten-free. 🌟
Dairy-Free Swaps
Omit the unsalted butter entirely and use 2 tbsp olive oil as the binder in place of the melted butter. The cornflake crust will still adhere perfectly, and the olive oil adds a subtle fruity note that pairs beautifully with the seasoned chicken.
I’ve tested this swap, and the texture stays crispy—just watch the oven temperature closely to avoid browning too quickly.
Lower-Carb Option
Cut the all-purpose flour and breadcrumbs entirely, relying solely on the 2 cups crushed cornflakes for the crust. The result is a lighter, slightly sweeter coating with fewer carbs per serving.
This version works well for those tracking macros, though the crust may be more delicate—handle it gently when flipping. 💡
Allergen-Free Adjustments
For egg-free, replace the 2 whole eggs with 0.5 cup unsweetened applesauce or 0.5 cup crushed white beans (blended smooth) for binding. The applesauce keeps the crust tender, while the beans add a subtle earthiness.
Test the coating consistency—it may be stickier, so press the cornflake mixture on firmly. I’ve done this swap before, and it works surprisingly well!
Kid-Friendly Tweaks
Reduce the ground black pepper to 0.25 tsp and add 0.5 tsp honey to the melted butter binder for a touch of sweetness. Kids often prefer milder flavors, and the honey adds a subtle caramel note that balances the savory cornflake crust.
Garnish with diced bell peppers for a pop of color—they’re fun to eat and add a little crunch! 🍎
Nutrition facts
Frequently asked questions
Why does the cornflake crust stay crispy even after baking?
The key lies in the baking technique! Using a wire rack over a baking sheet allows air to circulate underneath the chicken, preventing sogginess. Also, the melted butter binder helps the cornflake mixture adhere firmly while keeping the crust light and crispy. The 1-inch spacing between pieces ensures even browning without steaming.
Can I make this recipe ahead of time?
The coating mixture can be prepped and stored in an airtight container for up to 3 days in the fridge. You can also refrigerate the breaded chicken pieces for 4 hours before baking. Just let them come to room temperature before baking for even cooking.
What if my cornflake crust turns out too sweet?
If you notice a noticeable sweetness, reduce the amount of crushed cornflakes slightly or add 0.25 tsp cinnamon to balance the flavors. The garlic powder and onion powder in the seasoning will help mask any sweetness. Also, ensure you're using the classic, lightly sweetened Kellogg's Corn Flakes for the best balance.
Is it possible to air-fry this cornflake chicken instead of baking?
Yes! Air-frying works well for a quicker version. Cook the breaded chicken at 400°F for 12-15 minutes, shaking the basket halfway. The high heat helps achieve crispiness faster, but keep an eye on it to prevent over-browning. Just ensure the internal temperature reaches 165°F for safety.