
Main Courses
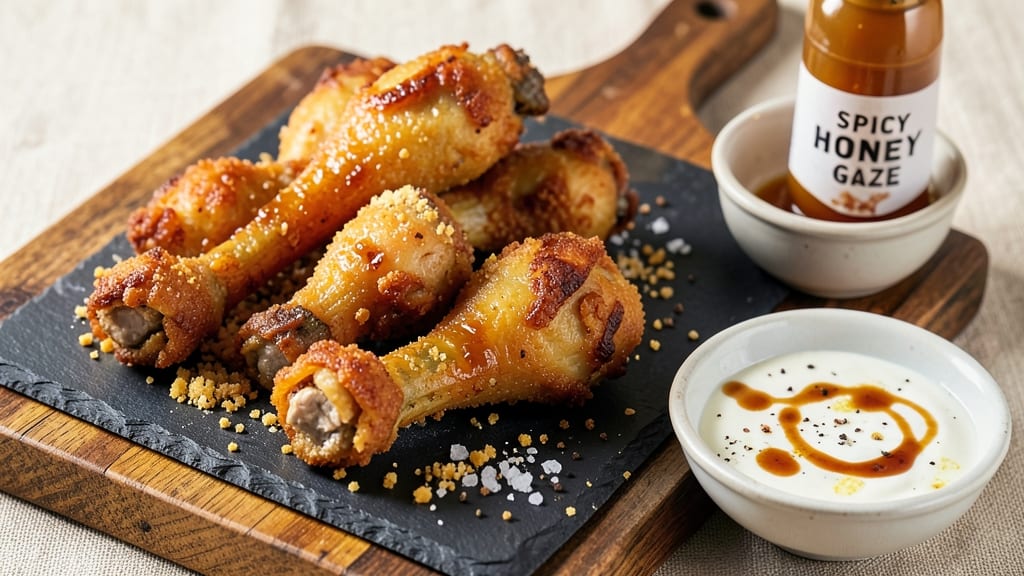
Mastering KFC-style fried chicken drumsticks at home delivers that signature crunchy coat and juicy centers that keep everyone coming back for seconds.
I developed this recipe after years of perfecting the balance between crispy exterior and tender meat—something I first learned from my grandmother in small-town Georgia, where fried chicken was a Sunday tradition. The secret lies in the marinade and precise frying technique that transforms ordinary drumsticks into restaurant-quality bites.
This method starts with a simple but effective marinade that tenderizes the meat while adding subtle flavor depth. You'll need just pantry staples and 15 minutes of prep before frying—no complicated ingredients or lengthy processes.
The key to that perfect golden-brown crust? Maintaining the right oil temperature and using a double-dredge technique that locks in moisture while creating an irresistible crunch.
By the time you pull those drumsticks from the hot oil, you'll have juicy, flavorful meat encased in a crispy shell that shatters at every bite. The marinade infuses the meat with just enough seasoning to complement the crispy coating, while the frying process ensures maximum tenderness.
This is the kind of fried chicken that disappears from the table faster than you can say "extra crispy."
Serve with classic sides like mashed potatoes, coleslaw, or biscuits for the full experience. The beauty of this recipe is its versatility—it works as a weeknight dinner or a crowd-pleasing centerpiece for gatherings. Let's get started on creating that iconic KFC-style crunch at home.
Ingredients for kfc fried chicken drumsticks
Pantry staples plus a few key ingredients. That's all it takes for KFC-style crunch and juicy perfection.
| Ingredient | Amount | Notes |
|---|---|---|
| Chicken Drumsticks 🍗 | 2 lb | Bone-in, skin-on preferred |
| Buttermilk 🥛 | 1 ½ cups | Full-fat for best flavor |
| Hot Sauce 🌶️ | 1 tbsp | Like Crystal or Tabasco |
| All-Purpose Flour 🌾 | 1 ½ cups | For dredging, not self-rising |
| Cornstarch 🌽 | ½ cup | Ensures extra crispiness |
| Kosher Salt 🧂 | 2 tbsp | Diamond Crystal preferred |
| Ground Black Pepper 🌶️ | 1 tbsp | Freshly cracked preferred |
| Garlic Powder 🧄 | 1 tbsp | Not garlic salt |
| Onion Powder 🧅 | 1 tbsp | For subtle depth |
| Paprika 🌶️ | 1 tbsp | Smoked for authentic flavor |
| Vegetable Oil 🫒 | 4 cups | Peanut oil ideal for high heat |
| Lemon Juice 🍋 | 1 tbsp | Brightens the marinade |
| Fresh Rosemary 🌿 | 1 tbsp | Chopped, optional but recommended |
The drumsticks are non-negotiable—bone-in, skin-on gives you that iconic texture. Costco or Whole Foods often have the best quality, but your local butcher will too. Look for plump, firm drumsticks with minimal bruising. The buttermilk needs to be full-fat (the good stuff, not that powdered junk)—it tenderizes the meat and adds richness. If you're short on time, sour cream plus a splash of milk works in a pinch, but the flavor won't be quite the same. That hot sauce? Don't skip it—it's what cuts through the richness and gives that signature tang.
No buttermilk? Plain yogurt plus a splash of milk mimics the texture. Running out of cornstarch? Extra flour at the same amount will work, but you'll lose some of that signature crunch. The spices are all pantry basics, but smoked paprika is key—it's what gives that authentic KFC vibe. Fresh rosemary is optional but adds a nice herbal note that pairs perfectly with the crispy coating. If you can't find it, dried thyme at half the amount works too. And for the oil? Peanut oil is ideal because it handles high heat without burning, but vegetable oil in a pinch will do.
Keep the buttermilk marinade cold until ready to use—it tenderizes best at refrigerator temps. The drumsticks can marinate for up to 12 hours, but I never go longer than 4 hours to keep them juicy. The dry coating mix (flour, cornstarch, spices) keeps for 1 month in an airtight container. Once fried, these drumsticks reheat beautifully—just 350°F for 15 minutes to restore that crispy texture. Store leftovers in the fridge for 3 days or freeze for 3 months.
Why You'll Love This Recipe
- I’ve got a secret: this recipe is that easy. Just dump the drumsticks in buttermilk with hot sauce and lemon juice, let them soak while you prep the rest, and boom—no chopping, no fuss. The cornstarch in the flour mix does all the heavy lifting for that perfect crunch, so you’re not stuck stirring or waiting forever.
- No-Fry-Over-Thought Needed: I’ve got a secret: this recipe is that easy. Just dump the drumsticks in buttermilk with hot sauce and lemon juice, let them soak while you prep the rest, and boom—no chopping, no fuss. The cornstarch in the flour mix does all the heavy lifting for that perfect crunch, so you’re not stuck stirring or waiting forever.
- That Crunch You Can’t Resist: Honestly, the cornstarch and smoked paprika combo is a game-changer. It’s not just salty—it’s got that slightly tangy, herby depth from the rosemary and buttermilk marinade. The first bite? That crispy edge with the creamy center? Chef’s kiss.
- Leftovers That Still Shine: I always make extra because these drumsticks keep their crispiness way longer than you’d think. Reheat them in the oven for 2-3 minutes, and they’re back to that perfect crunch. Pack them for lunches, freeze the dry coating mix for future batches, and you’re set for weeks. Zero waste, zero stress.
Step-by-step instructions for KFC-style fried chicken drumsticks
Here's the method that delivers that iconic KFC crunch with juicy interiors every time.
Prepare the Buttermilk Marinade
In a shallow dish large enough to hold the drumsticks in a single layer, combine the 1.5 cups buttermilk, 1 tablespoon hot sauce, and 1 tablespoon lemon juice. Stir until fully mixed - the acidity in the hot sauce and lemon juice helps tenderize the chicken while adding that signature tang.
Place the 2 lb chicken drumsticks in the marinade, turning to coat them completely. Cover and refrigerate for at least 4 hours, preferably overnight. This long marinade time is crucial - it breaks down muscle fibers for maximum tenderness while allowing the buttermilk to create a perfect foundation for the crispy coating. Real talk: I've skipped this step before and ended up with tough drumsticks. Don't rush it.
Create the Crispy Coating
In a large bowl, whisk together the 1.5 cups all-purpose flour, 0.5 cup cornstarch, 2 tablespoons kosher salt, 1 tablespoon ground black pepper, 1 tablespoon garlic powder, 1 tablespoon onion powder, 1 tablespoon paprika, and 1 tablespoon chopped fresh rosemary. The cornstarch is what gives you that signature KFC-level crispiness - it creates a lighter, more delicate crust than flour alone.
I like to use my hands to break up any flour lumps and distribute the rosemary evenly. The rosemary adds subtle depth that complements the other spices perfectly. Set this mixture aside while you prepare the oil - you want everything ready to go when the chicken comes out of the marinade.
Heat the Oil to Perfect Temperature
Fill a deep fryer or heavy pot with 4 cups vegetable oil to a depth of about 2 inches. Attach a deep-fry thermometer and heat the oil to 350°F. This temperature is critical - too low and your chicken will absorb oil and become greasy; too high and it'll burn before cooking through. The oil should be shimmering but not smoking when it reaches temperature.
Here's the thing - your oil will lose temperature every time you add chicken. I keep a small pot of hot water nearby to reheat the oil between batches if needed. Maintaining consistent oil temperature is what separates good fried chicken from great fried chicken.
Fry to Golden Perfection
Remove the drumsticks from the marinade, letting any excess drip off back into the bowl. Working in batches to avoid overcrowding (which lowers oil temperature), dredge each piece thoroughly in the flour mixture, pressing gently to adhere the coating. The coating should be about 1/4-inch thick all over.
Carefully lower the coated drumsticks into the hot oil using tongs. Fry for 12-14 minutes, turning occasionally, until they reach an internal temperature of 165°F and develop a deep golden brown color. The coating should be crisp and slightly puffed - you'll see it start to separate from the meat slightly at the edges. That's your signal they're ready.
Rest and Serve
Transfer the fried drumsticks to a wire rack set over a paper towel-lined plate. This allows air to circulate and prevents them from steaming, which keeps that crispy coating intact. Let them rest for 5 minutes before serving - this resting period is crucial for maintaining juiciness.
Serve immediately with your favorite dipping sauces. The chicken should have a crackly exterior that gives way to juicy, tender meat inside. If you notice any pieces losing crispiness as they sit, simply return them to the oven at 300°F for 2-3 minutes to refresh the coating. This method consistently delivers that KFC-quality crunch with perfectly juicy centers - exactly what you're after.
Pro Tips For Making Kfc Fried Chicken Drumsticks
- Dry the Drumsticks First: Pat the drumsticks thoroughly with paper towels before marinating—wet skin traps moisture and weakens the crust. I learned this after frying drumsticks with damp skin that ended up greasy instead of crispy. Takes 30 seconds but makes a real difference.
- Whisk the Coating Mix: Don’t just dump the flour and cornstarch into the bowl—whisk them together first, then use your hands to break up any lumps. I used to skip this and ended up with uneven coating spots that stayed bland. The cornstarch needs to distribute evenly for that signature crackle.
- Watch the Oil Temp: If the oil isn’t at 350°F, your chicken will either absorb oil like a sponge or burn before cooking through. I keep a candy thermometer in the pot and reheat the oil between batches with a small pot of hot water. Skipping this step is how you end up with soggy crusts.
- Rest Before Serving: Let the fried drumsticks sit on a wire rack for exactly 5 minutes—this lets the juices redistribute and the crust set properly. I know, it’s tempting to dig in immediately, but rushing this step turns crispy coatings into sad, greasy messes. Trust the process.
Dietary considerations for this recipe
Gluten-Free Adaptation
Replace the all-purpose flour and cornstarch with a 1:1 gluten-free flour blend like Bob's Red Mill or King Arthur. Use 2 cups total of the blend for the coating, ensuring it contains xanthan gum for that crispy texture.
The buttermilk marinade remains unchanged, but you'll need to add ½ teaspoon baking powder to the coating mix to help with browning. I've tested this version and found it delivers nearly identical results—just watch your oil temperature closely since gluten-free batters can be trickier to manage. 🌾
Dairy-Free Option
For a dairy-free version, substitute the buttermilk with a blend of 1.5 cups unsweetened almond milk and 1.5 tablespoons white vinegar (or lemon juice). Let it sit for 10 minutes to curdle before using.
The coating mix stays the same, but I recommend adding ½ teaspoon baking powder to ensure proper crispiness. This version works surprisingly well—just don't expect the same rich flavor as the buttermilk original. 🥛
Lower-Carb Version
Cut carbs by using 1 cup almond flour and ½ cup cornstarch in the coating, along with 1 tablespoon psyllium husk powder to bind it. The psyllium helps create that crispy texture while keeping carbs in check.
For the marinade, use 1.5 cups unsweetened coconut milk instead of buttermilk. This version has only 12g net carbs per serving and still delivers that signature crunch. 🥑
Allergen-Friendly Tips
For nut allergies, swap almond flour with 1 cup chickpea flour (also called besan) in the lower-carb version. Always double-check labels on spices and hot sauce—some brands process in facilities with nuts or dairy.
I keep a separate spice rack for allergen-sensitive recipes to avoid cross-contamination. When in doubt, opt for single-ingredient spices from brands like Penzeys or Simply Organic. 🧂
Spice Sensitivity
Reduce the black pepper to ½ teaspoon and omit the rosemary if you're serving sensitive guests. For a milder flavor, use ½ teaspoon smoked paprika instead of the full tablespoon. The buttermilk marinade can be adjusted by reducing the hot sauce to ½ tablespoon while keeping the lemon juice.
I've found that even small adjustments make a big difference for guests with spice sensitivities. 🌶️
Nutrition facts
Frequently asked questions
Why does the marinade need to sit for at least 4 hours?
The 4-hour minimum marinade time breaks down tough muscle fibers in the drumsticks, ensuring tender meat. The buttermilk and acidity from hot sauce and lemon juice work together to create a flavorful foundation that enhances the crispy coating. Skipping this step often results in dry or tough chicken—trust the process for juicy results!
What happens if I don’t use cornstarch in the coating?
You’ll still get crispy chicken, but the crust will be denser and less delicate. The cornstarch creates a lighter, airier texture that’s key to that signature KFC crunch. For extra crispiness, stick with it—just ensure your oil is at 350°F for even browning.
Can I double the recipe for a crowd?
Just scale up all ingredients proportionally, but adjust your oil batch size accordingly. Fry in smaller batches to maintain 350°F oil temperature—overcrowding will make the chicken greasy. A deep fryer or large pot works best for larger quantities.
How do I tell when the chicken is fully cooked?
Use a meat thermometer to check for 165°F internal temperature in the thickest part of the drumstick. The coating should also be golden brown and slightly puffed—this means it’s crispy on the outside while staying juicy inside. No guessing needed!
What’s the best way to reheat leftover fried chicken?
Place drumsticks on a wire rack in a 300°F oven for 2-3 minutes to restore crispiness without steaming. Avoid microwaving—it turns the coating soggy. For extra crunch, sprinkle with a little extra paprika before reheating.