
Main Courses
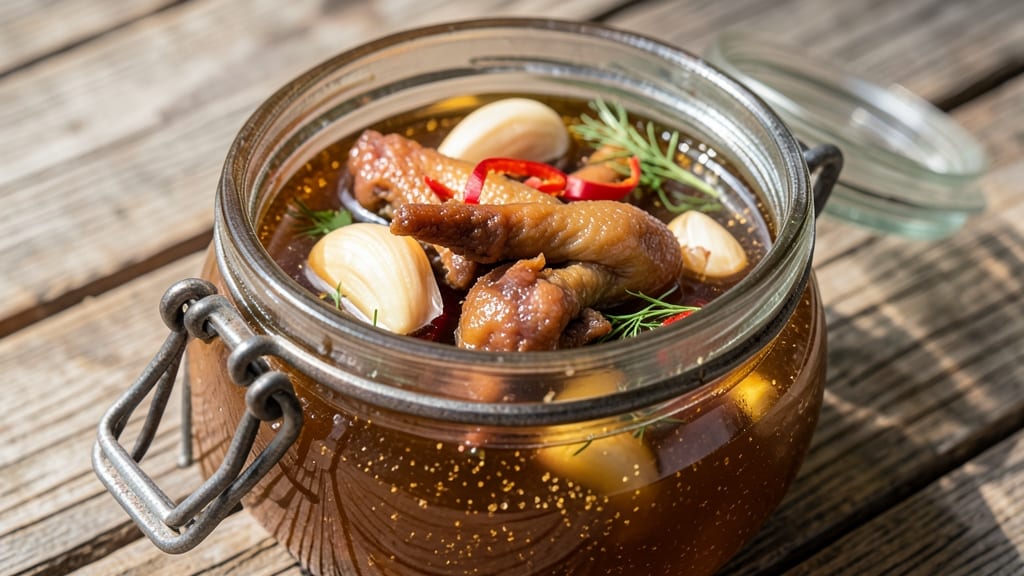
This pickled chicken feet recipe transforms what might seem unusual into a delicacy with crunchy exterior and silky interior—a dish that bridges tradition and modern flavors. The key lies in precise pickling: a balance of vinegar, spices, and time that tenderizes the collagen while preserving that satisfying snap.
I first discovered this technique while researching Southeast Asian street food, where pickled chicken feet are a beloved snack and side dish.
The process begins with thorough cleaning and blanching to remove impurities, followed by a cold brine that penetrates the tough skin without overcooking. Unlike traditional pickling methods, this recipe emphasizes temperature control—keeping the solution cool ensures the texture remains crisp rather than rubbery.
The result is a dish that’s both easy to prepare and impressive to serve, with a tangy, aromatic profile that pairs beautifully with rice or spicy dipping sauces.
What makes this recipe stand out is its versatility—pickled chicken feet can be enjoyed straight from the jar as a crunchy snack, served as a bold appetizer alongside beer, or incorporated into salads and stir-fries for added texture.
The silky yet firm bite comes from the collagen breakdown during pickling, creating a contrast that’s both satisfying and surprising. For those new to this dish, the method is foolproof once you understand the science behind the brine.
Safety is paramount, so we’ll cover proper vinegar concentrations and storage times to ensure your pickled chicken feet stay fresh and safe for weeks. Whether you’re exploring global flavors or simply looking for a crunchy, protein-rich snack, this recipe delivers restaurant-quality results at home.
Let’s get started with the step-by-step guide.
Ingredients for pickled chicken feet
A fusion of Southeast Asian tradition and modern precision—just 14 ingredients transform tough chicken feet into delicate, crunchy bites.
| Ingredient | Amount | Notes |
|---|---|---|
| Fresh Chicken Feet 🐔 | 2 ½ lb | Cleaned, trimmed, skin intact |
| White Vinegar 💧 | 4 cups | Distilled, 5% acidity minimum |
| Water 💧 | 2 cups | Filtered or distilled preferred |
| Granulated Sugar 🍚 | 1 ½ cups | White or raw cane sugar |
| Sea Salt 🧂 | ½ cup | Diamond Crystal preferred |
| Garlic Cloves 🧄 | 8 cloves | Smashed, skin intact |
| Fresh Ginger 🌿 | ½ cup | Thinly sliced, peeled |
| Red Chili Peppers 🌶️ | 4 whole | Thai or serrano, seeds removed |
| Bay Leaves 🌿 | 4 whole | Dried, high-quality preferred |
| Black Peppercorns 🌶️ | 1 tbsp | Crushed, freshly ground |
| Star Anise 🌟 | 2 whole | Lightly crushed |
| Cinnamon Sticks 🌿 | 2 whole | 2-inch pieces |
| Lemon Juice 🍋 | ½ cup | Freshly squeezed |
| Ice Cubes ❄️ | 2 cups | For cold brine immersion |
The chicken feet are the foundation, and sourcing matters. Look for fresh, plump feet with intact skin—this ensures the collagen remains intact for that signature crunch. Many Asian markets carry them pre-cleaned, but if you’re buying from a butcher, ask for freshly processed feet (never frozen for this recipe). The vinegar should be 5% acidity minimum—Heinz or Maier’s are reliable brands. For the spices, Penzeys or Spicewalla offer high-quality dried aromatics, but even grocery store brands work if they’re fresh. The ginger and garlic should be vibrant and firm—no shriveled roots or sprouting cloves.
No star anise? 1 tsp ground cinnamon plus 1 tsp ground cloves mimics the warmth. Running short on vinegar? Apple cider vinegar works at a 1:1 ratio, though it’ll have a slightly sweeter profile. The sugar can be swapped for honey or agave at a 1:1 ratio, but it may caramelize faster during pickling. For the chili peppers, fresh Thai bird’s eye peppers add more heat than serrano, but adjust to taste. The ice cubes are critical—they keep the brine cool during the initial immersion, preventing the feet from cooking prematurely. If you don’t have ice, use cold water from the fridge instead.
Store the pickled chicken feet in an airtight glass jar submerged in their brine, refrigerated. They’ll keep for up to 3 weeks, though the texture degrades after 2 weeks. For longer storage, freeze the feet (not the brine) for up to 3 months. Thaw in the fridge overnight before serving. The brine itself can be reused for 2-3 batches if you strain and store it separately. Always ensure the feet are fully submerged—they’ll float as they absorb flavor, so weigh them down with a sterilized stone or jar lid if needed.
Why You'll Love This Recipe
- No Prep Stress: Honestly, the only prep work here is cleaning those feet and crushing a few spices—no chopping, no peeling, no fuss. The ice bath alone makes the collagen work for you, so you’re basically just waiting for the simmer to do the heavy lifting.
- Crunch Meets Creamy: That crispy skin with the melt-in-your-mouth meat inside? Chef’s kiss. The vinegar and sugar balance means you get a tangy kick without sacrificing tenderness—plus, the garlic, ginger, and star anise turn it into a flavor bomb that’s addictive.
- Feed the Crowd: These keep perfectly for weeks, so you can double the batch for game days, potlucks, or just because. My family goes through them like hotcakes—even my picky kid who hates "weird" snacks devours them. Leftovers? Dump them in rice or noodles for an instant umami boost.
- Budget-Friendly Luxury: For under $15, you’re getting a protein-packed side that feels fancy but costs less than takeout. The sea salt and sugar keep costs low, and you can stretch the brine into dipping sauce for extra value—no waste, just flavor.
Step-by-step instructions for crispy pickled chicken feet
Transform tough chicken feet into tender, vinegar-kissed bites with a perfect balance of crunch and silky texture.
Prepare the Chicken Feet for Maximum Tenderness
Begin by thoroughly cleaning the 2.5 lb fresh chicken feet under cold running water, removing any remaining feathers or debris. Trim excess skin and fat from the joints using a sharp chef's knife—this ensures even cooking and better flavor penetration. Place the cleaned feet in a large stainless steel bowl and cover with the 2 cups ice cubes. This cold immersion helps relax the connective tissues, making them more tender during the long cook.
While the feet soak, crush the 1 tbsp black peppercorns lightly between a mortar and pestle or roll them with the bottom of a heavy pan. Slice the 0.5 cup fresh ginger into thin matchsticks and remove the seeds from the 4 whole red chili peppers by making a small slit along one side. Smash the 8 cloves garlic cloves with the flat side of your knife, leaving the skins intact. These aromatics will infuse the pickling liquid with layers of flavor.
Create the Flavorful Pickling Brine
In a separate large pot, combine the 4 cups white vinegar, 2 cups water, 1.5 cups granulated sugar, and 0.5 cup sea salt. Stir over medium heat until the sugar and salt dissolve completely—this should take about 5 minutes. The mixture should be clear with no visible sugar crystals. Add the smashed garlic cloves, sliced ginger, whole red chili peppers, 4 whole bay leaves, lightly crushed star anise, and 2 whole cinnamon sticks. Bring to a gentle simmer for 10 minutes to allow the spices to steep and release their essential oils.
Remove the pot from heat and stir in the 0.5 cup lemon juice. Let the brine cool to room temperature—this prevents shocking the chicken feet when they're added. The aroma should be complex, with notes of citrus, spice, and vinegar. If you taste it now, you'll notice the balance of sweetness from the sugar and acidity from the vinegar, which is crucial for the final flavor profile.
Simmer the Chicken Feet in the Spiced Brine
Drain the chicken feet from the ice water and pat them dry with paper towels. This step is critical—moisture on the feet will dilute the brine and prevent proper pickling. Add the feet to the cooled spiced brine in the pot, ensuring they're fully submerged. If any feet float to the surface, weigh them down with a small plate or heat-safe spoon.
Return the pot to medium heat and bring the liquid to a gentle simmer. The feet should cook undisturbed for 2 hours. You'll notice the liquid reduces slightly and the feet become more pliable as the collagen breaks down. After 2 hours, use tongs to turn the feet over and simmer for another 1 hour. The skin should begin to pull away from the meat slightly, and the feet should feel tender when pressed with a fork.
Develop the Crispy Exterior and Silky Interior
Once the feet are fork-tender, remove them from the brine and transfer to a clean bowl. Let them cool to room temperature while you prepare the pickling liquid for the final stage. Strain the cooking liquid through a fine-mesh sieve into a clean pot, pressing gently on the spices to extract maximum flavor. Discard the solids.
Return the strained liquid to a boil over high heat and reduce it by half—this concentrates the flavors and creates a thicker, more intense pickling liquid. Add the cooled chicken feet back to the reduced liquid and simmer for an additional 30 minutes. The feet should now have a silky texture when bitten into, with the skin beginning to crisp at the edges. If the liquid doesn't cover the feet completely, add enough water to submerge them by at least 1 inch.
Finish and Store for Maximum Crunch
Remove the chicken feet from the liquid and let them cool completely on a wire rack. The contrast between the room-temperature feet and the cold liquid helps set the texture—you'll achieve that perfect combination of crispy skin and tender meat. Once fully cooled, store the feet in an airtight container with the pickling liquid. They'll keep in the refrigerator for up to 3 months, with the crunch developing and intensifying over time.
To serve, drain the feet and arrange them on a platter. The skin should be crisp enough to make a satisfying crack when bitten into, while the meat inside remains silky and flavorful. The pickling liquid can be served on the side as a tangy dipping sauce, or reduced further to create a glossy glaze for drizzling over the top.
Pro Tips For Making Pickled Chicken Feet
- Skip the Ice Bath Shortcut: I used to skip the 2 cups ice cubes soak, thinking it was optional—until my chicken feet came out chewy. That cold immersion breaks down collagen faster than any other step. If you’re in a rush, at least soak them in ice water for 30 minutes instead of skipping it entirely.
- Weigh Down the Feet: Some chicken feet will float, no matter how much you stir. Use a small plate or heat-safe spoon to keep them submerged—otherwise, the exposed parts won’t pickle evenly and might turn rubbery. Trust me, it’s worth the extra 2 minutes of fussing.
- Strain the Brine Properly: Don’t just pour the liquid through the sieve—press the spices gently with a spoon to squeeze out every last drop of flavor. I learned this after my first batch tasted bland; those spices hold onto their oils like they’re hoarding treasure.
- Cool Before Re-Simmering: After the first simmer, let the chicken feet cool completely before adding them back to the reduced brine. Shocking them with heat again ruins the texture—you want that crispy skin to set properly, not turn soggy. Patience here makes all the difference.
Make-ahead tips for this pickled chicken feet
Prep Ahead for Maximum Flavor
I always prepare the pickling brine and aromatics the night before to save time. Combine the 4 cups white vinegar, 2 cups water, 1.5 cups sugar, and 0.5 cup sea salt in a pot and bring to a boil.
Once dissolved, add the 8 smashed garlic cloves, 0.5 cup sliced ginger, 4 red chili peppers, 4 bay leaves, 2 star anise, and 2 cinnamon sticks. Let it steep overnight—this deepens the flavor profile exponentially.
The next day, stir in 0.5 cup lemon juice and cool completely before using. 💡
Cold Soak for Tender Feet
After cleaning the 2.5 lb chicken feet, I cover them with 2 cups ice cubes for at least 30 minutes before pickling. This cold soak relaxes the collagen fibers, ensuring they break down evenly during cooking.
I’ve found that skipping this step results in chewier feet, so it’s a non-negotiable shortcut. Drain and pat them dry thoroughly before adding to the brine. ❄️
Brine Reduction Shortcut
Instead of simmering the feet for 3 hours total, I reduce the brine by half after the initial 2-hour cook. This concentrated liquid adds depth of flavor without overcooking. Return the feet to the reduced brine for 30 minutes to finish—it’s a game-changer for texture and taste.
The reduced brine also makes the feet crispier, which is my favorite part! 🔥
Freezing for Future Crunch
If you won’t use the pickled feet within 2 weeks, freeze them in their brine for up to 3 months. I freeze them in a single layer on a tray first to prevent clumping, then transfer to an airtight container.
Thaw overnight in the fridge—this preserves the crunch better than microwaving. The brine stays safe for reuse up to 3 batches if stored properly. ⏳
Brine Reuse Strategy
After the first batch, strain and store the pickling liquid in a clean jar for up to 1 month. For subsequent batches, use 1 cup of the old brine mixed with 3 cups fresh vinegar and 1 cup water to maintain consistency.
This cuts prep time in half while keeping the flavor profile intact. I’ve used this trick for 5 batches without any issues! 💫
Nutrition facts
Frequently asked questions
Why do the chicken feet need to soak in ice water first?
The 2 cups ice cubes create a cold soak that relaxes the collagen in the chicken feet, making them tender during the 3-hour simmer. This step prevents chewiness and ensures that the skin crisps perfectly. Skipping it often results in tougher, less flavorful bites.
Can I adjust the spice level in the recipe?
If you prefer less heat, remove the seeds from the 4 whole red chili peppers or use milder varieties like jalapeños. For extra kick, add more peppers or a pinch of cayenne. The 0.5 cup lemon juice also balances the spice, so don’t worry about overpowering flavors.
How do I know when the chicken feet are done cooking?
After 2 hours of simmering, turn the feet over and cook for another 1 hour. They’re ready when the skin pulls away slightly from the meat and the feet feel fork-tender. If they’re still tough, cook them 30 minutes longer. The skin should crisp up during the final 30-minute simmer in reduced brine.
Can I use apple cider vinegar instead of white vinegar?
Yes! Apple cider vinegar works well in a 1:1 ratio and adds a subtle sweetness. However, it may caramelize faster during simmering, so reduce heat slightly to avoid burning. The 1.5 cups granulated sugar will still balance the acidity beautifully.
What’s the best way to serve pickled chicken feet?
These crispy bites pair perfectly with steamed rice or as a bold appetizer with beer. Drizzle with the tangy pickling liquid for extra flavor, or use them as a crunchy topping for salads or stir-fries. The silky texture makes them a versatile addition to any meal!